
When I went to Thailand a few years back, one of my trip highlights, was trying out and riding (with assistance!) a small Yamaha Aerox automatic scooter around Hua Hin. I’ve always been interested in bikes, and after getting my Class 3A, I thought I’d give my Class 2B a shot while I had some free time.
I would like to preface this by saying your 2B journey will not be easy. There is a good reason why this article has an estimated reading time of 34 minutes. Singapore widely known as the hardest place to learn how to ride in the world. Its tedious, expensive, annoying and you’ll likely have many falls, but it felt extremely rewarding to see that endorsement sticker on my license after all that effort put in.
Singapore only has three driving/riding schools where you can learn how to ride a motorcycle, ComfortDelGro Driving Centre (Ubi), Bukit Batok Driving Centre (Bukit Batok) and Singapore Safety Driving Centre (Woodlands). Price wise, all three schools are quite similar, though the lesson structure and waiting time varies between different schools. My suggestion is to choose the school closest to you.
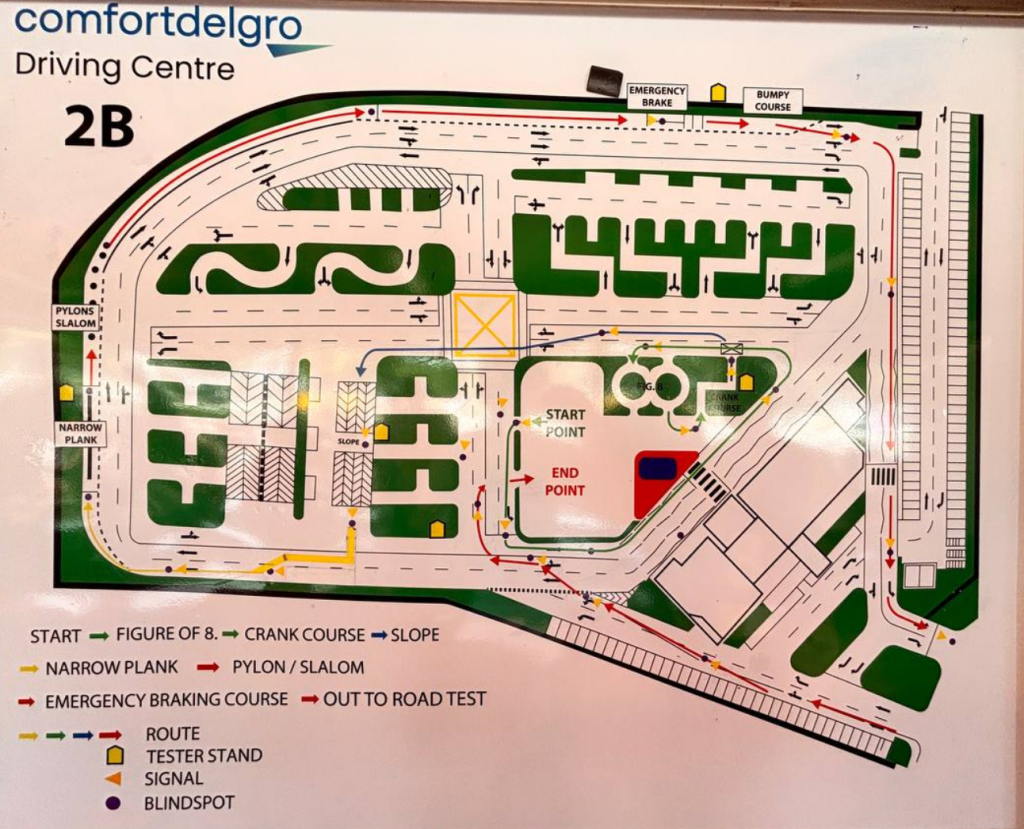
I chose ComfortDelGro Driving Centre (CDC) since it was the nearest to me, and I had recently passed my Class 3A license through a private instructor at CDC a few weeks before enrolling. Thus, I was familiar with the circuit too. This write up should also be one of the first few that are based on the new test route that was set in place February this year.
From what I’ve read online, BBDC has the best lesson structure as they split up the lesson contents into more manageable sections, which many find helpful. I personally didn’t mind the Lesson 1-8 structure in CDC, and I felt it was manageable and it allowed me to progress faster since I passed most of the lessons on the first try. My CDC experience was okay, with my main gripe being the lack of availability for lessons and tests, making it hard for many to progress.
Enrolling & Overview

Enrollment can be done online or in-person. If you have an existing Class 3A/3 license, make sure you indicate that you’ve passed your BTT already, and have an existing QDL. Enrollment costs $179.85 + $10 (refundable $10 deposit upon graduation), and your membership is valid for a year.
Download the CDC App for bookings, as well as the CDC RDT App for lesson information, attendance taking and recordings of your circuit courses.
Theory Lessons & Test
Once you enroll, you should immediately go and top up your account and book your theory lessons. Its best to clear these as soon as possible to avoid issues down the road. You can take theory lessons in any order (as I did) if you cannot get consecutive slots. You will need to clear your Riding Theory Lessons A&B, Defensive Riding Theory Lessons 1-3, and your Basic Theory Lessons A&B.
After all your lessons, the option to book the Internal Evaluation should become available. It is a really stupid concept and cash grab to up their passing rates, but you just need to pass this to be able to book your actual Basic Theory Test (BTT) and Riding Theory Test (RTT). Make sure you book this as soon as possible, as the RTT has a very long waiting time. You can check the next available test dates here.
If you have your Class 3/3A license, you can skip the basic theory lessons and tests as your BTT score is valid for a lifetime unless revoked.
Practice for your theory tests, since its quite a long wait if you fail the actual RTT. If you do your proper practice and sit down and learn, its quite easy to pass. There are free question banks on the SPF website, as well as a few free sets of the mock tests from CDC. You should also read through the basic theory and riding theory handbook, which you can access for free on the SPF website. Make sure you are reading the latest revision of the handbook, as the first links on Google may be outdated.
Simulator Lessons
Simulator sessions are a new requirement from the Traffic Police (TP) that you are able to book after attending five practical lessons, regardless if you passed or failed them, excluding your orientation session. Simulator sessions cost $30.30 per session and you cannot fail them.
These take around 20 minutes to complete, and I’d suggest you book all of them on the same day or before your classes. CDC only allows you to book them with a one session gap in between sessions. The simulator room is next to the coffee shop.
For the motorcycle simulator, there is a dress code in place:
- Long pants, no shorts
- Fully covered gloves
- Fully covered shoes, no slippers/sandals
The simulator is probably one of the most expensive and forgettable things you’ll go through. The entire thing could really just have been a video. The session will show how its like to drive under the influence, manoeuvre situations like wet weather, glare and road works.
Practical Lessons
Lessons in CDC (and to my knowledge, in all the other driving schools too) are split up into eight lessons covering the fundamentals. Everything you need to know about riding and passing your test is covered in these lessons. Its normal to not pass every lesson on the first try, especially since everyone is different. I failed 3 lessons once – my Lesson 1, 6 and 8.
CDC, as with all the other driving schools in Singapore, is massively overcrowded. While the slot situation for motorcycle lessons aren’t as bad as motorcar lessons, there are still long waits between lessons. Thus, a you should book two lessons 48 hours apart. Should you fail your first try at the lesson, you’ll still have a fallback lesson close by, allowing you to progress faster. You get 18 free cancellations at CDC, so you can cancel each lesson after you pass, or if you find an earlier slot. I used up 17 cancellations for getting earlier slots and booking two lessons each time.
Many others will also be using this method, so make sure you check a few minutes before and after each lesson ends for any cancellations that you can take. If you aren’t going to camp or check for slots regularly, you can expect a 1-2 week wait between lessons. If you are diligent enough and have enough free time, its possible to clear all Lessons 1-8 within a month. You can check my timeline at the end of the post for what I did.
At CDC, there are two types of motorcycle models; the Suzuki GSX-S150 (numbered 30-100) and the Yahama YBR (numbered 1-30). The Suzuki bikes are much newer and are now the only bikes used for the actual test and most lessons past Lesson 3. The Yamaha bikes are much older and not well maintained, and are usually used for Lessons 1-2. In addition, since each motorcycle has a different feel, you should keep a log of which bikes you liked riding or think are good. This can also help you to decide, if you want to, which bike to reserve for the test. I’ve linked a website I used as a PWA on my phone to track the school motorbike details below.
Do arrive around 15 minutes early for each lesson to give yourself time to wear all your gear and to reserve a bike you like or are familiar by putting your helmet on it.
Lesson Gear
Except for the circuit training programme, you need to wear proper gear for every lesson, test, and revision you go to. You will need to purchase:
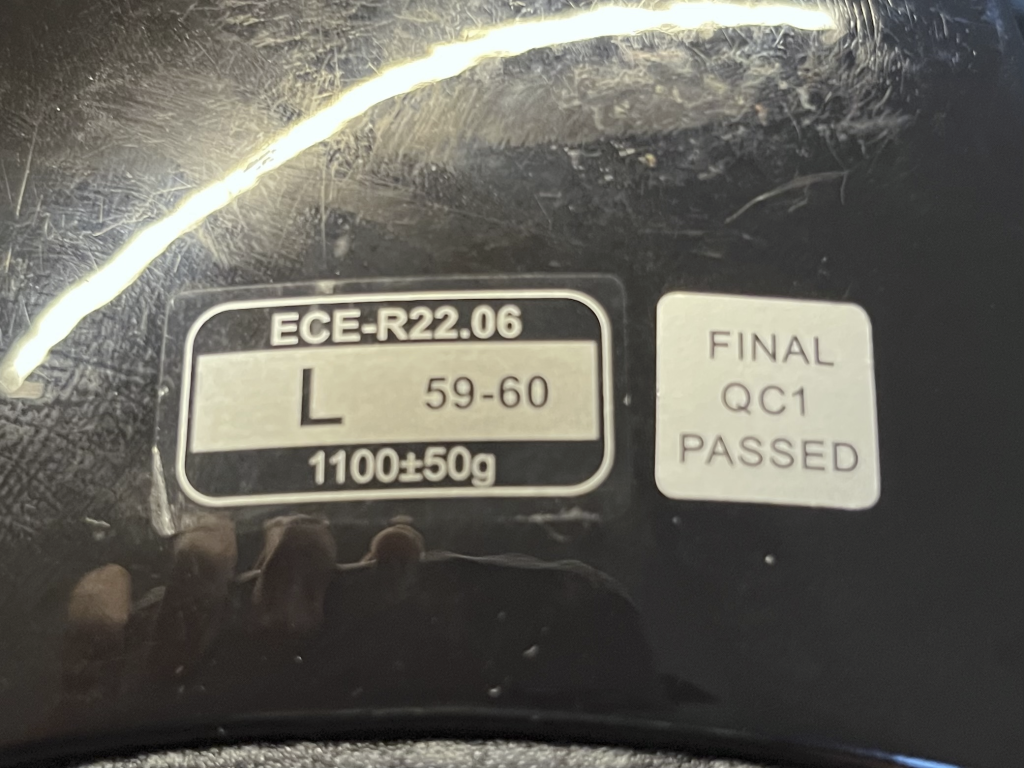
- A PSB OR ECE22.06 approved helmet
- Only approved helmets in Singapore can be used on the road. Lookout for the sticker or tag on the strap.
- Elbow and Knee Guards
- Riding Gloves
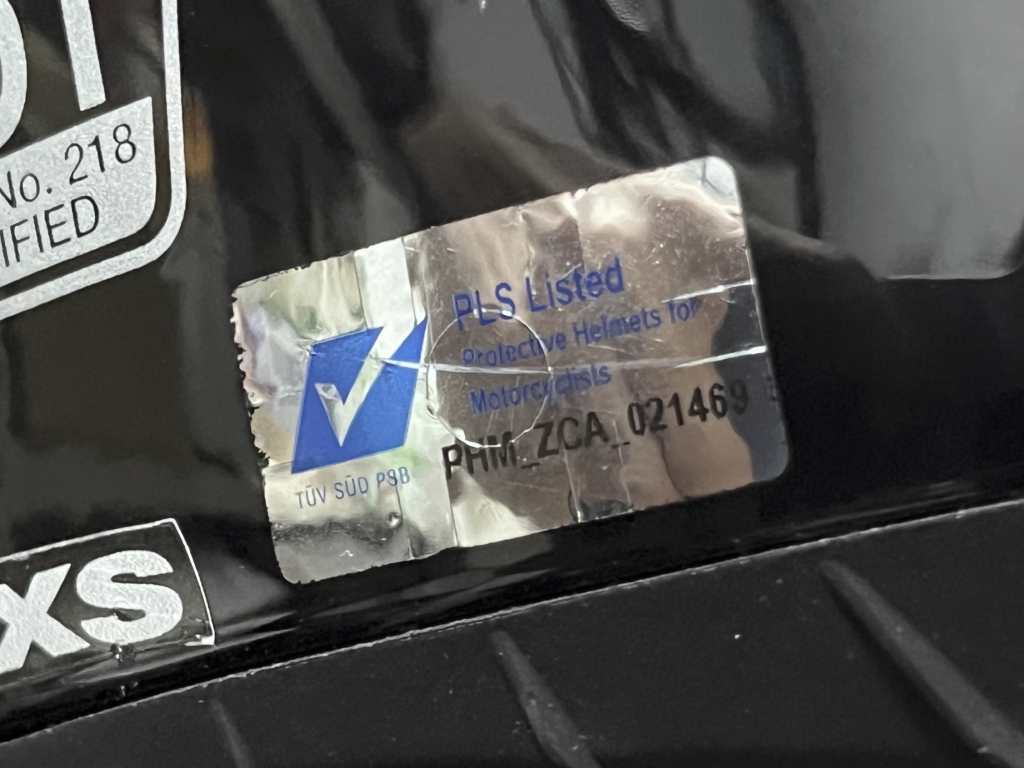
Some shops offer learner kits where they bundle the helmet, guards and gloves all in one. I went for this set, since it was an ECE22.06 approved helmet, which came with a quick release strap. Riding as a pillion, I always found it a bit finicky to use the ‘Double D’ strap. I visited the shop in person to try the helmet to make sure it fit me properly. I recommend you do so too to get a helmet that fits you well. A properly fitted helmet is important for safety!
Note that CDC only allows modular or open face helmets. I’d also recommend not going for expensive helmets while you are learning since you’ll likely fall and scratch them before you get to properly use them. Once you pass, you should definitely go look at a full face or modular helmet!
Circuit Training Programme
School Orientation
This is a basic orientation where the instructor will walk you through your Class 2B journey, including all the steps you need to take, apps you need to download, and a quick tour of CDC. You’ll also get to learn and try out how to mount a bike on its main stand.
You don’t fail this lesson, and you need to book it to be able to book Lesson 1. You don’t need to bring any gear for this lesson.
Once you’ve completed this lesson and passed your BTT, you will be able to apply for your Provisional Driving License (PDL), that is required for Lessons 6-8, your Traffic Police Practical Test and Expressway Familiarisation Ride.
Lesson 1
Basic Riding
Lesson 1 covers everything about basic riding. Start/stops, clutch control, gear shifting, braking and more are covered in this lesson. If you have no experience riding a manual transmission motorcycle, you will need to take Lesson 1 at least twice, if not thrice. I took this lesson twice. If you have experience driving a manual transmission motorcar, there should also be less of a learning curve for you.
You’ll start by learning how to find your biting point, as well as how to start/stop the motorcycle. Each motorcycle’s biting point is a little bit different. If you have trouble finding it, try slowly letting out your clutch until your RPMs drop, your engine starts making a different sound, and you start to feel the bike inching forward. That is your biting point.
If you are good enough, you’ll ride around the nursery in circles where you’ll learn how to shift up to gear 3, and come to a stop. This is followed by some riding within the main circuit where you will practice coming to a stop and engine braking.
If this is your first time operating a manual transmission vehicle, its helpful to understand how the clutch works, especially on a motorcycle before you move on. There are many helpful YouTube videos that explain this. For this lesson, focus on your clutch control, shifting of gears, riding smoothly and coming to a stop smoothly.
Lesson 2
Road Rules & Safety Checks
Lesson 2 will be quite simple, especially if you already drive. You will learn all your safety checks and take left and right turns. Make a note of where you should signal, stop, check back right, check your blindspots and when to check your mirrors. Make sure you are able to stop and start smoothly too.
During your actual assessments and tests, one of the most common points to accumulate come from failure to check blindspots and wobbling. Make sure you clarify and know all of these before you progress!
Lesson 3
Figure of 8, Crank Course & Slope
This will be the first lesson where you try the circuit courses. You will learn the Figure of 8 (aka. S Course), Crank Course and Slope in this lesson.
On the Slope, remember your safety checks and your stopping positions. When you are coming into the course, signal towards the kerb that you are going into. You should only kick down to first gear when you are about to stop on the slope, going up while on first gear is not advisable.
When stopping, hold on to both your rear and front brakes. Then, complete your safety checks; signal away from the kerb, check back away from the kerb then move off. When moving off, gradually release your rear brakes, so that if you accidentally roll back, you are able to brake and not roll back too far.
You need to avoid three things on this course — over revving the engine, rolling back and stalling your bike. To do this, you need to know the optimal biting point of your bike, and give the right amount of throttle when you reach your biting point. To find your biting point, you can look at your RPMs or listen to your engine. When it starts to drop slightly, or you hear a change in the sound, you know you are there.
When going down the slope, use engine braking and do not free wheel. This is a good habit to adopt even after you pass as extended periods of time using your front or rear brakes aren’t good.
Once you’ve stopped at the stop line, inch out one full bike length and communicate with the rider next to you before moving off. Be patient when heading out of the slope and always ensure 5 lane clearance, failing to give way is an immediate failure during any assessment. This road is extra crowded, so you may be stuck here for a while when doing your test route.
The Figure of 8, was one of the hardest for me, especially when coming out of the course itself. I didn’t manage to hit the minimum required time of 11 seconds on my Lesson 8, but I took enough revisions to meet the requirements on my test.
The procedure is:
- Check left blindspot, check back right, left signal should be on when queuing.
- Move into course, kick up into gear 2, switch off signal
- Look far, keep a constant throttle
- At the second tree, switch on your left indicator
- Exit the course
There are two things to remember, Look far and where you want to go, and keep a constant throttle. By looking far and keeping a constant throttle, you’ll become smoother at this cornering and this course. If you need to adjust your speed, gently tap your rear brake and not your front brakes.
If you are struggling with the Figure 8, try going round the nursery area where the circles are when there is no Lesson 1 in session to improve your cornering. The quadrants are a good indicator of where to look.
The Crank Course is quite simple, but you will need to learn to have balance and control over your bike. The time requirement for to complete this course is 6 seconds, at your own discretion, though its quite easy to achieve.
Once you are ready to depart, check your left blindspot and check back right. Your left signal should be activated, and you can keep it on until you exit the course. Kick up to gear two before the white line, and you should be able to coast through the course without any throttling. This should also help you be smoother. Try not to have any sudden acceleration, since this will affect your balance, which will already be quite strained as you are making lots of tight turns.
Before exiting, check if there is any oncoming traffic. Yield to them and stop before the yellow box if so. Don’t forget to do your safety checks before moving off. Switch on your right signal if you are turning into the right lane.
Lesson 4
Narrow Plank, Pylon Slalom & Emergency Brake
The first course you will be tackling will be the plank, the most feared course at CDC. This course tests your low speed control and balance of your motorcycle, and you will need to ride without falling off a 20m x 30cm metal plank.
Before mounting the plank, you need to align yourself correctly. Line up your bike with the plank in front of you while queuing. When mounting, you need to give enough gas and accelerate enough to make sure your alignment is right. Focus on mounting and riding through the plank before you start thinking about the timing.
Grip your fuel tank with your knees/legs and keep your upper body relaxed. By applying more forces to your lower body, and relaxing your upper body, you will be more balanced. Making your upper body compensate for balance by stiffening up your shoulders and elbows can make you unstable and fall of the course.
Instead of leaning your body left and right to balance, you should be using your handlebars to balance yourself. Make very subtle adjustments, and if you feel you are wobbling too much or are out of balance, you probably need to throttle up a bit more.
When you go slow, its natural to look closer. However, to balance on this course, you will need to look far. I always liked to look at the blue pedestrian crossing signs along the road as a landmark. In addition, try not to move your head from side to side. This can disrupt your balance.
I always did the half-clutch technique through the course, and tapped on my rear brake where I could to stay on the plank for longer. There are many different methods of riding through the plank, but I liked this since it allowed me to be more smooth if I needed to give more throttle.
The timing of six seconds isn’t actually quite hard to achieve, and you should be able to master this course once you are able to mount, look forward and grip your tank.
This was me on Lesson 4, the first time I successfully did the plank:
Right after the plank is your pylon slalom. This tests your ability to avoid obstacles at speed. You will need to navigate through a set of cones within 6 seconds.
Once you stop from the plank, check back right and throttle up. Quickly kick up to second gear before the first cone. Look far and not at the cones, wherever you look is where you will go.
Your speed and throttle control is important in this course. I don’t recommend constantly accelerating. You should instead accelerate just as your bike is straightening up when you are going from one cone to the next. With a ‘on-off’ throttle technique, you should be easily able to achieve the required time of 6 seconds. If your bike is too fast, use your rear brake to regulate your speed.
Where you are looking is where you will be going, so don’t focus on the cone directly in front of you. Look towards the next cone when you are moving. Once you are at the last cone, check back right before moving on to the E-brake course.
The E-brake course is quite simple. The main faults people get are wrong posture, technique and failure to get up to speed.
After moving off with your safety checks, get up to a speed of 30-35km/h. If the light on the bike isn’t already broken, it will flash yellow to tell you and the tester you have gotten up to speed.
The correct posture for your E-brake is so look straight ahead, lock your elbows and straighten your figure. Your sighting point to start braking will be a lamp post on the left.
While the Suzuki GSX bikes do have ABS, you should still be mindful of skidding. This is especially so since the course is often sprayed with water. You should apply both brakes, but note that more stopping power will come from the front brake and not the rear brake. It should be around a 7:3 to 8:2 ratio of braking power respectively.
Once you brake, make sure to stop before the white line, and do not downshift, you should be stopping in third gear. If you stalled, start your engine and complete your safety checks.
- Check back right
- Put right leg down
- Downshift from third to first gear. If the gears are ‘stuck’, let out your clutch slightly and try downshifting.
- Check back left
- Left foot down, right foot up, brakes depressed
- Signal right
- Check back right
Once you are done with your safety checks, leave the course by bypassing the bumpy course on the right. You will then need to give way to traffic as you are merging back onto the main circuit.
When you check back right before moving off, use this opportunity to note for any oncoming cars. If there are any, make a mental note and stop at the give way line. If you are unsure, just stop to confirm. Only proceed from the give way line when there is two lane clearance, and at least a 3 car spacing from any other road traffic from you. If a car or bike is after the tester stand, wait for it to pass. Note that failure to give way is an immediate failure.
Remember to take your time with your safety checks and be mindful of the give way line.
Below are some helpful videos by Tsukinowa Driving School in Japan, that go into detail about the plank and pylon course.
Lesson 5
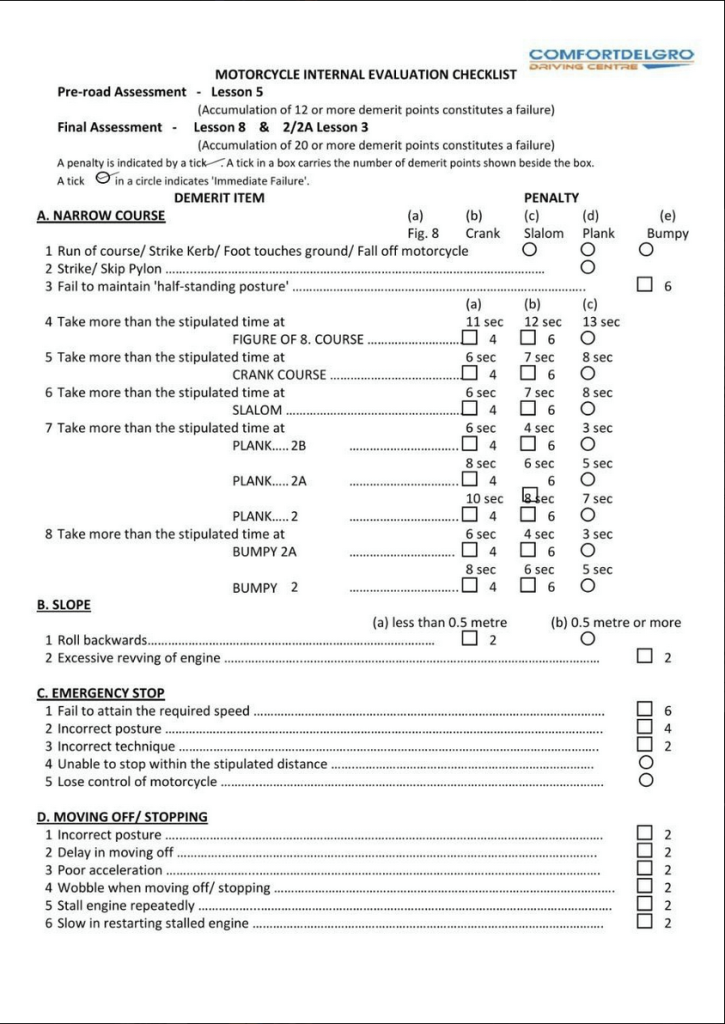
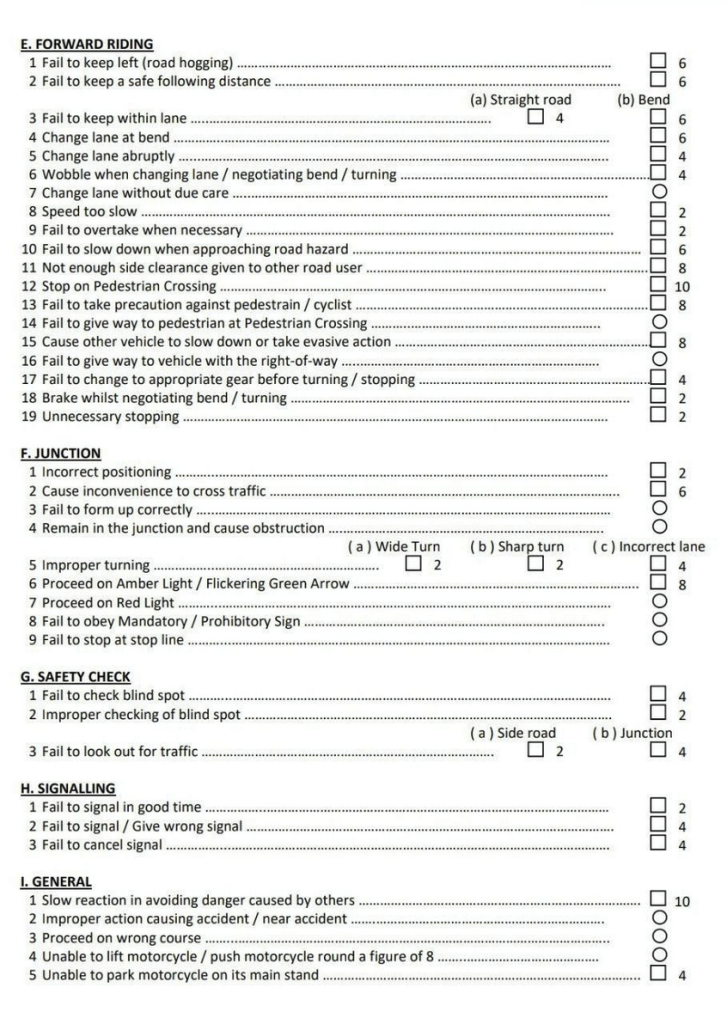
Circuit Assessment
Lesson 5 is a mock test for your circuit. Once you pass your Lesson 4, instead of booking for Lesson 5, book 1-2 circuit revisions before going. This is because you will need to familiarise yourself with the circuit test route, which is shown to you during these circuit revision sessions. In addition, you will need some practice to ace all of the circuit segments, especially since you only have 10 demerit points to work with for this assessment.
Lesson 5 itself is quite short, you have a short briefing, one warm up round, then the assessment round.
Lesson 6
Public Road Riding
Congratulations on mastering your circuit segment! You’ll finally be going out on the real road. To be able to book this lesson, you need to complete your DRT theory lessons. In addition, as you will be going on the public road, you will need to have your provisional drivers license (PDL) for this lesson. You should apply for these early so as to not delay your learning journey.
You will start with a long briefing about road riding. Make sure you listen to this carefully! Your positioning, safety checks and staggered riding are what the instructors are looking for. In addition, you’ll be trying out a U-Turn for the first time. The feeling is kind of similar to exiting the Figure 8 course.
After the briefing, you will ride around CDC on a set route a few times. This route is not the practical test route, so there is no need to memorise it.
To pass this lesson, the instructor will be looking for things like your staggered riding formation, your road positioning and if you check your blindspots.
Check out these slides (not mine!) about public road riding. Note that only the general riding section is accurate, the circuit and public road test route is outdated!
Lesson 7
Practical Test Route
You’ll be going through the road test route for the first time! Remember what you were taught in Lesson 6, and watch the road test route video on the RDT app before going for your lesson.
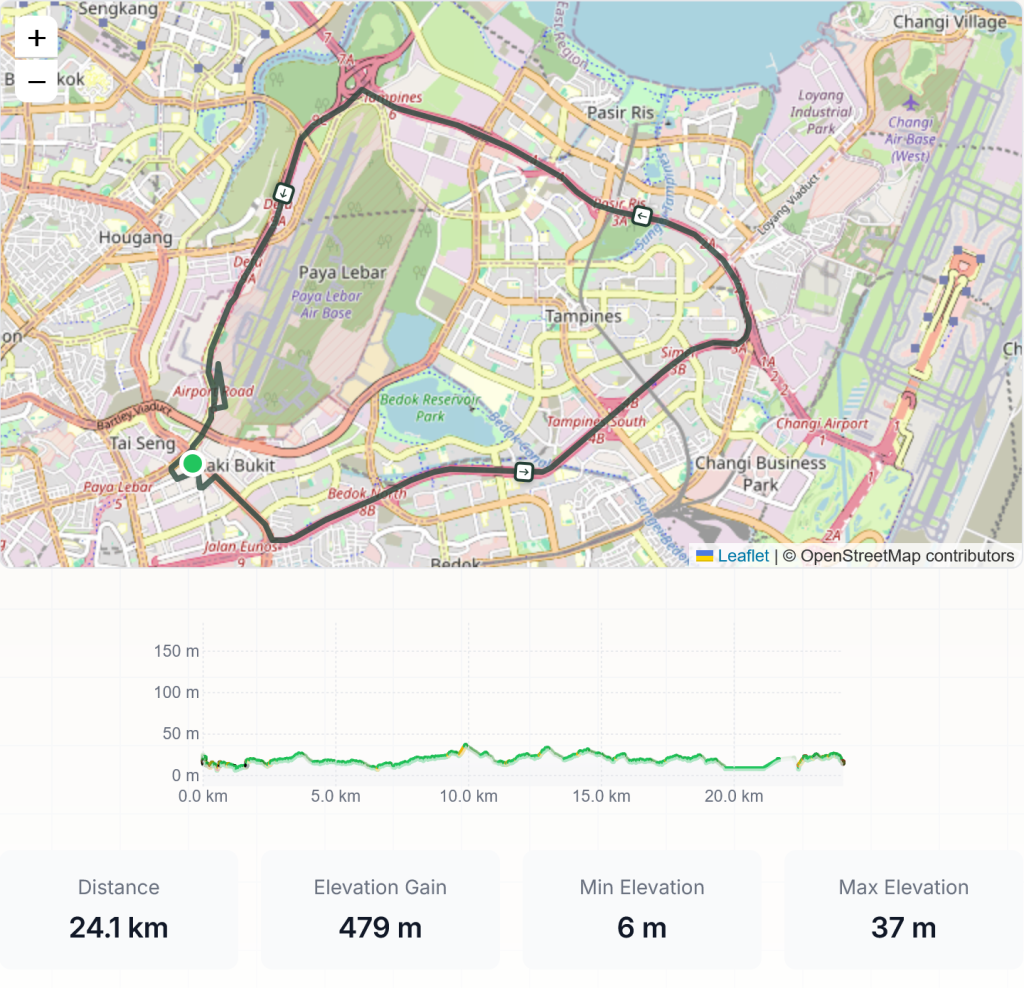
As this test route is new and has only been in use since February 2026, a few things have changed since the video on the RDT app was shot. For example, there is no need to lane change to the left after you turn right onto Eunos Link — you just need to stay on course for your U-Turn.
Be mindful of the following:
- Your speed. Pick up speed to around 50 km/h, especially along Eunos Link
- Remember the bus lane timings
- When to stay in single file, or staggered position
Look out for landmarks to remember where to turn.
- Overhead Bridge on Eunos Link → change to Lane 1 before the bridge
- Traffic Police Headquarters → Right turn
- Oxley BizHub → Ride in single file
- SCDF Building → Lane change to the right
You also should remember the positions of where to stop to wait for your instructors and other trainees. With the exception of Eunos Link and the westbound section of Ubi Avenue 3 until the first traffic light, you need to stop after each traffic light and wait for everyone.
The following is a guide on the new test route:
Lesson 8
Mock Test Assessment
Lesson 8 is mock practical test, and will be your final hurdle before you can book and attend your actual practical test. Book a few circuit revisions or self practice before to prepare yourself for the assessment.
You will only get one warm up round on this lesson, so use it wisely. To pass, you will need to get <18 points and zero immediate failures.
Circuit Revisions
You can start booking these after Lesson 4. Circuit Revisions are time for you to practice the circuit test route on your own. There are no shortage of slots, making it extremely easy to book. You can usually get same day revisions if you are free on the day.
Before you head out, you will also get time with the instructor to clarify on things like your circuit test route, questions you have or administrative matters for your practical test. In addition, you’ll be able to access your circuit recordings, demerit points and timings through the RDT app.
Self-Practice
Self practice sessions like circuit revisions, but are only one hour long. They are done at your own time and own target, and are a great way for you to learn while the circuit is empty. I loved these sessions as they were the most worth it price wise, and you could book the circuit when it was empty.
Book sessions from 12-1pm and 6-7pm. This is when the school instructors students are on break, so there are less vehicles on the circuit, allowing you to attempt more practice on the courses. I used these sessions to get better on my figure 8 and crank course.
You cannot cancel these sessions, and you will not be able to view your circuit recordings on the RDT app on these sessions.
Road Revisions
You can start booking Road Revisions after Lesson 7. While these sessions are harder to come by, you should be able to book some by camping and checking regularly. Road revisions are bundled with retraining sessions (a session you are required to take if you fail your practical test), and are essentially the same thing. As the passing rates have dropped since the new road and circuit route debuted, slots have been harder to come by.
I enjoyed road revisions because I had time to try all the parts of the circuit and the road during the session. You will go for a warmup circuit test route round before you go out for the road. Then, depending on the size of your group, you will be split into two groups to do the road test route twice. If there is time remaining, you will be able to use the remaining time to practice on the circuit at your own discretion.
Occasionally, some road revisions are held during Class 2/2A test mornings. During these sessions, you won’t be able to use the Figure 8 or Crank courses, and there won’t be an opportunity to use your remaining free time on the circuit. This seems to be a relatively new thing to try to accommodate the larger demand.
Line up enough circuit revisions/self-practice and road revision sessions close to your practical test date.
Practical Test
As of writing, the waiting time for practical tests are around 40 days. You can check the latest available dates here. I would suggest booking after your Lesson 8, and arranging enough circuit revisions before your test.
Before attending your practical test, you should think about reserving a bike. While its not absolutely needed now since Yamaha bikes cannot be used for tests, it still can provide you peace of mind knowing you will be on a familiar bike with a biting point you are familiar with.
If you do decide to book a bike, head over to the motorcycle counter and find/ask for the bike booking folder where you can reserve your preferred bike. This should be available a few weeks before your test date. At the time of writing, it costs $16.35 to do so. Your reserved bike is not guaranteed for your warmup or your Expressway Familiarisation Ride.
The practical test is a full day affair, so keep your whole day free should you pass. You’ll only be completed at around 2pm by the earliest.
Make sure to bring your:
- NRIC
- Physical Drivers License (for endorsement should you pass)
- All your riding/ safety gear
- Phone to show your PDL via SingPass
You’ll start by reporting to CDC early in the morning. Its best to come at 0645, but you should arrive latest by 0700. Since your day starts early, sleep early and get sufficient rest! if you are coming from Eunos MRT, a warm soyabean milk drink from Mr Bean at the station was great for me!
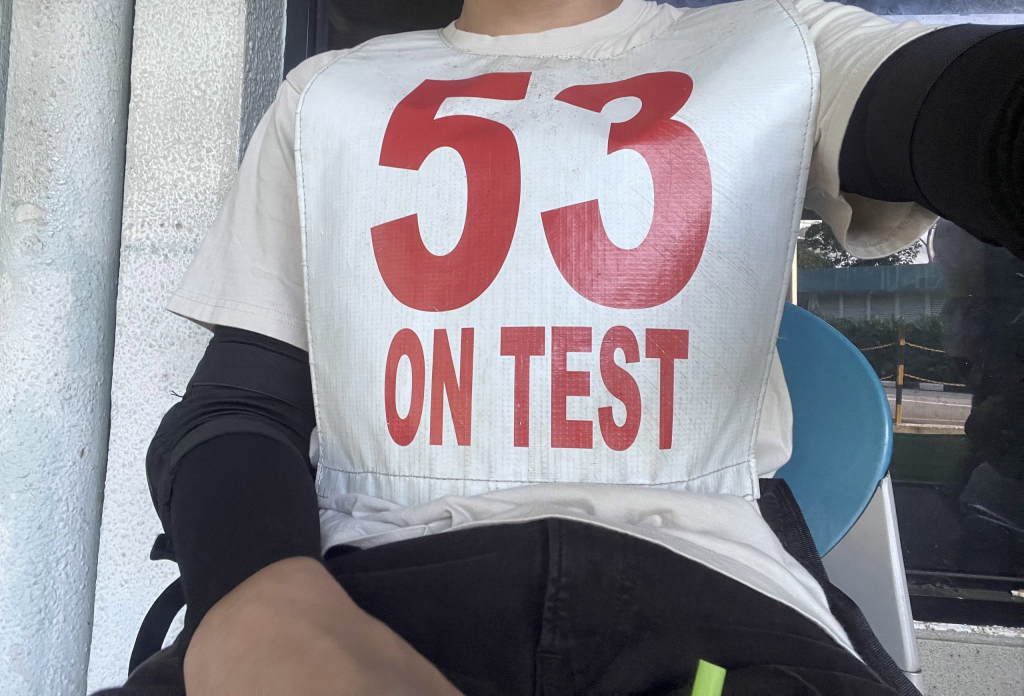
After that, you will collect and sign off your number tags. Tests now usually have around 60 candidates, though at its peak there were around 100 people taking it at once. Number tags are ordered with foreigners first, followed by the oldest to youngest rider.
Once you collect your number tags, you’ll be out for your circuit warmup. If you reserved a bike for the test, it is NOT guaranteed to be used for warmup. You will only get one round of warmup, and you should complete this by 0800. Note that the queue for the Figure 8 for the warmup and test is different — you should form up as a single file until the yellow box, after which you will line up in rows of two.
Once everyone returns back from the warmup, there will be a short circuit test route briefing by the instructors to clear your last doubts up. Don’t be afraid to ask anything! You’ll be making the payment for your reserved bike (if you have done so) at this point. Once the instructors briefing is complete, the time is handed over to the testers.
The testers will then check your PDL, and give you a short briefing of what to take note of. Your test starts the moment you get on the bike, and only ends once you put the main stand up. You will be released in batches of 3-10 to alleviate congestion, in ascending order of your number tags.
Stay alert, don’t panic or rush, this will cause you to make mistakes. I find that I tend to make more mistakes when under stress. There will be instructors to help guide traffic at certain sections, and many cars will give way to you. However, if in doubt, always follow your textbook rules, as failing to give way can be a failure. Should a tester not see a simple handwave from a car that allows you to go, your test could end there.
Make sure your riding is as smooth as possible. Any slight wobble will be booked, and should your right foot come down at anytime, that could be noted as an improper action causing near accident, which is an immediate failure. Lastly, make sure all your safety checks are obvious.
Once you are done, head back to the circuit area and park up your bike. Be mindful that your circuit portion of the test only ends once your bike is parked up on the mainstand. As everyone returned, some people were called out to discuss with the testers some mistakes or issues that were made. You’ll then be able to go for a break to grab a bite or drink before you come back for your circuit results.
After the break ends, the testers will call out the tag numbers of those who failed the circuit portion. Almost like a reality show, those who are called out take a walk of shame back to the reporting counter to get debriefed on their mistakes. If your number isn’t called out, you are clear to move out to the road portion of the test. Note that you won’t know your points if you pass the circuit portion.
Before you go out for your public road riding, another briefing for the next segment will be conducted by the instructors. The mood here was much lighter after knowing everyone passed their circuit portion, but don’t get complacent. While it is true that less people fail the public road segment of the test, you could still have racked up 18 points during your circuit, and one missed blindspot would be all it takes for you to fail that day.
This segment is usually conducted after bus lane hours, but be sure to check the time before you are called out to your bikes. You will be released in batches, so make sure to ride in formation. Just be calm, perform all your safety checks, and be smooth. Make sure to communicate with your other riders who goes first at junctions too.
Once you have parked up your bike back at CDC, you will be released for another short break before the final results are annouced. We were directed to a classroom on Level 2 near the tester office where we waited for 20-30 mins for the results to all be tabulated. Once ready, a tester and a instructor jointly called out those who failed.
Out of all 60 people who took the test that day, around 35 passed the circuit assessment section. Of the 35, around 20-25 passed the road segment. This means that the passing rate is around 33%-41%, and the first time rate likely even lower.
Don’t be disheartened if you fail. Take time to process your mistakes, rethink and retry. When I failed my Class 3A tests, doing an analysis on why I failed really helped to improve my subsequent test results. If you failed your test, you will need to go through a compulsory re-training session before you can take your test again. This is just a regular road revision session that is bookable 24 hours after your test date.
If you passed, congratulations! It is now time to book and complete your final ride at CDC, your mandatory Expressway Familiarisation Ride (EFR). Make sure you top up at least $44.69 in your account.
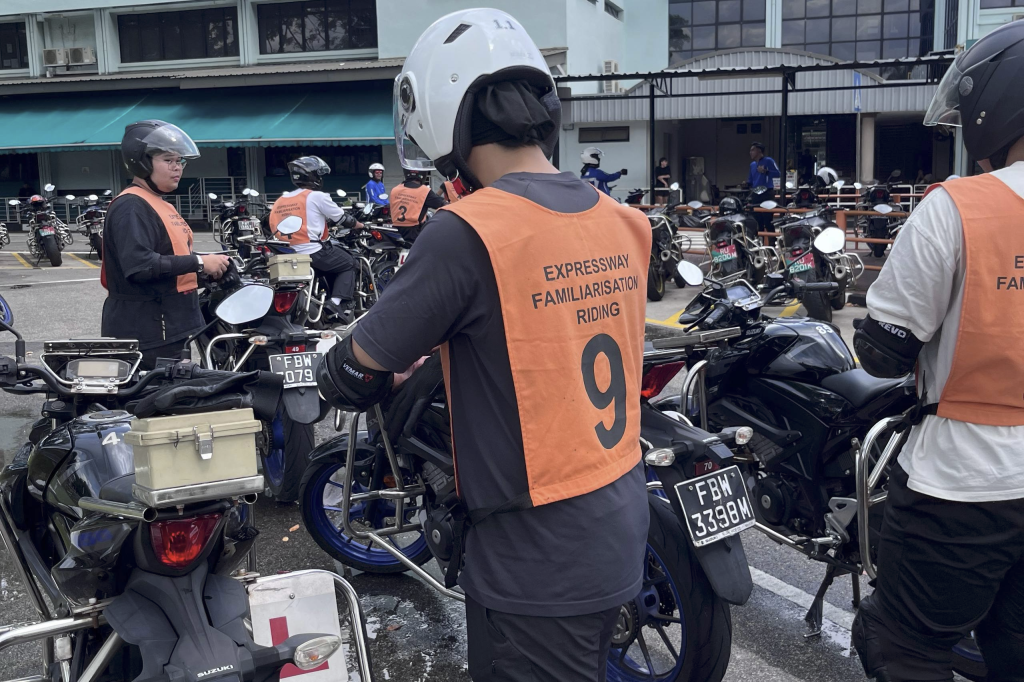
On every test day, there are two sessions available for EFR at 1245 and 1435. However, since our test results were released in two batches, and I was the latter of the two owing to my number tag, I only managed to grab the later ride. After having lunch with my fellow test candidates, we reported for our EFR.
We rode in two groups of five at expressway speed on the PIE, TPE, and KPE. Its an amazing experience, since this will be the first time you’ll be experiencing such speeds. The leading instructor will show signs for your formation, and indicate when they will change lanes. Follow their instructions, keep up with the speeds, stay in formation and have fun!
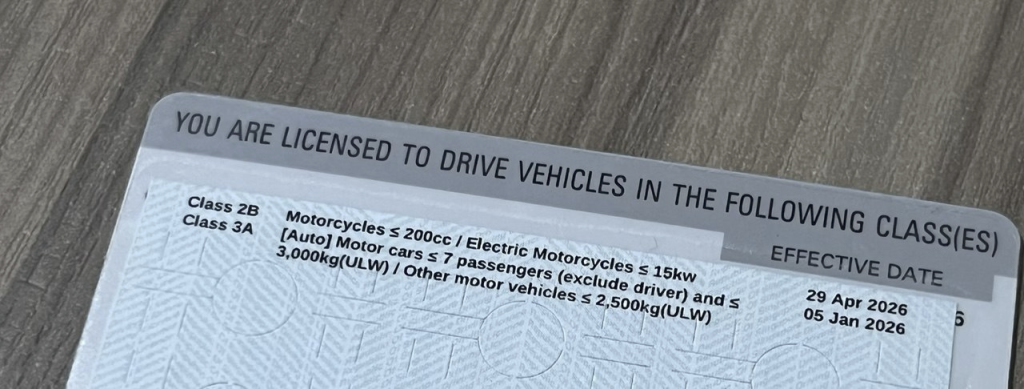
Once you get back, you’ll be closing your account and getting your license endorsed. It takes about two weeks to get your refund and deposit back into your account via PayNow.
If you have an existing driving license, take that and your test paper with the EFR endorsement stamp and head up to the testers office to get your license endorsed. Those without an existing license can visit this website to apply for their license after a few hours.
And that is it for your test day procedures. I arrived at 0645, and left at around 1600, so it was an extremely long and tiring day. Here is how I spent my time that day:
| 0645-0700 | Report to CDC |
| 0700-0715 | Collect & sign off number tags |
| 0715-0800 | 1x round of circuit warmup |
| 0800-0830 | Briefing by instructors |
| 0830-0900 | Briefing by testers |
| 0900-0955 | Circuit test |
| 0955-1010 | Break |
| 1020-1100 | Road test briefing & circuit test results |
| 1100-1140 | Public road test |
| 1140-1200 | Break |
| 1200-1230 | Final Results |
| 1435-1530 | Expressway Familiarisation Ride |
| 1530-1600 | Endorse drivers license |
Final Notes & Costs
My computer sadly died a few weeks before my practical test, where I had a detailed excel sheet of my spending. However, I managed to retrieve my account booking summary logs before I closed it.
I spent a total of $1,295.59. This seems to be around the average for most learners, though I did more revisions than usual, and only took one test. I would recommend setting a comfortable budget of around $1.4K for everything.
- Enrollment Fees
- Riding Theory Internal Evaluation
- Riding Theory Test
- 3x Simulator Sessions
- 11x Practical Lessons
- 2x Lesson 1
- 1x Lesson 2
- 1x Lesson 3
- 1x Lesson 4
- 1x Lesson 5
- 2x Lesson 6
- 1x Lesson 7
- 2x Lesson 8
- 6x Road Revisions
- 5x Circuit Revisions
- 3x Self-Practice
- 1x Traffic Police Practical Test
- 1x EFR Ride
in Singapore getting any license, let alone a motorcycle license, is exhausting, expensive, stupidly tedious, and tiring. It can feel like everyone doesn’t want you to pass and wants to milk money from you at every possible juncture. Even if you had the will and money to learn, it could be impossible due to the extremely limited slots at CDC.
But in my view, the effort you put in is well worth it. I learned and mastered a new skill with great instructors, and I feel well prepared for riding! I might even be back for my Class 2A next year.
I was only able to complete the license relatively fast due to the amount of free time I had set aside, so do be realistic in your timeline. Its easy to get demotivated, especially after not going for lessons for so long, or failing many. Every person also has a different learning pace, so don’t be disheartened if you fail your lessons or even your test.
I hope this guide was helpful to those taking or looking to take their bike license at CDC! Let me know if you have any questions, or if I missed out anything!
That wraps up how to learn to ride a motorcycle in Singapore, the hardest place to learn how to ride in the world.
Resources
Timeline
| Enrollment | 20 January 2026 |
| Circuit Training Orientation | 27 January 2026 |
| Riding Theory Lesson B | 28 January 2026 |
| Defensive Riding Lesson 2 | 29 January 2026 |
| Defensive Riding Lesson 3 | 30 January 2026 |
| Defensive Riding Lesson 1 | 1 February 2026 |
| Riding Theory Lesson A | 3 February 2026 |
| Lesson 1 (Failed) | 6 February 2026 |
| Riding Theory Internal Evaluation (Passed) | 9 February 2026 |
| Lesson 1 (Passed) | 9 February 2026 |
| Lesson 2 (Passed) | 16 February 2026 |
| Lesson 3 (Passed) | 19 February 2026 |
| Lesson 4 (Passed) | 21 February 2026 |
| Circuit Revision 1 | 23 February 2026 |
| Simulator Session 1 | 23 February 2026 |
| Simulator Session 2 | 23 February 2026 |
| Circuit Revision 2 | 24 February 2026 |
| Simulator Session 3 | 24 February 2026 |
| Lesson 5 (Passed) | 24 February 2026 |
| Circuit Revision 3 | 27 February 2026 |
| Lesson 6 (Failed) | 27 February 2026 |
| Riding Theory Test (Passed 49/50) | 5 March 2026 |
| Lesson 6 (Passed) | 6 March 2026 |
| Self Practice 1 | 11 March 2026 |
| Lesson 7 (Passed) | 11 March 2026 |
| Road Revision 1 | 12 March 2026 |
| Lesson 8 (Failed – 2 IF) | 16 March 2026 |
| Circuit Revision 4 | 16 March 2026 |
| Road Revision 2 | 18 March 2026 |
| Lesson 8 (Passed – 16 points) | 18 March 2026 |
| Circuit Revision 5 | 1 April 2026 |
| Road Revision 3 | 6 April 2026 |
| Road Revision 4 | 14 April 2026 |
| Self-Practice 2 | 21 April 2026 |
| Self-Practice 3 | 23 April 2026 |
| Road Revision 5 | 25 April 2026 |
| Road Revision 6 | 28 April 2026 |
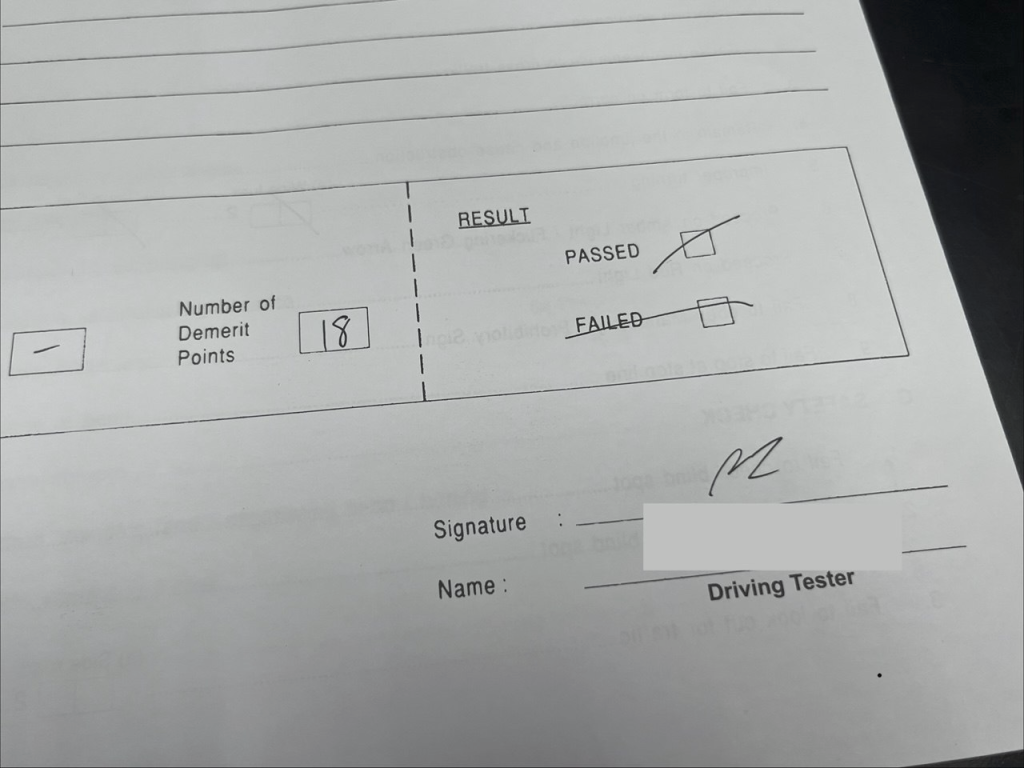
| Traffic Police Practical Test (Passed – 18 points) | 29 April 2026 |
| Expressway Familiarisation Ride | 29 April 2026 |
Thank you for reading! I hope this was helpful to you! If you like what you see, consider joining my Telegram Channel where i post updates on the blog and other cool stuff I am up to!
Leave a Reply